Automatically run a macro when opening a workbook
You might want a macro you recorded to run automatically when you open a specific workbook. The following procedure uses an example to show you how that works. You may also want to run macros automatically when Excel starts.
Before you get started, make sure the Developer tab is shown on the ribbon. If it’s not there, do the following:
- Click File > Options > Customize Ribbon.
- Under Customize the Ribbon, in the Main Tabs box, check the Developer box.
- Click OK.
To use the example below in your own workbook, create sheets for each day of the month and name each sheet tab accordingly. For example, name them March 1, March 2, and so on, through March 31. The macro will automatically run when you open the workbook showing the tab for the current day of the month.
- Click Developer > Visual Basic.

- Click Insert > Module.
- In the module, insert the following code:Private Sub Auto_Open()
Dim vntToday As Variant
vntToday = WorksheetFunction.Text(Date, "mmmm dd")
On Error Resume Next
Sheets(vntToday).Select
If Err <> 0 Then
MsgBox "Worksheet doesn't exist."
Else
Range("A1").Select
End If
End Sub - Close Visual Basic (you don’t have to save anything).
- Save the workbook as an Excel Macro-Enabled Workbook (*xlsm) and close it.
The next time you open the workbook, the tab for the current day will be selected, with the cursor in cell A1. If the worksheet for the day doesn’t exist, the “Worksheet doesn’t exist” message appears.
TIP: You could create a new workbook for each month as it comes up, and create the macro again for the new workbook.
Automate tasks with the Macro Recorder
Applies To: Excel 2016 Excel 2013 Excel 2010 Excel 2007
To automate a repetitive task, you can record a macro with the Macro Recorder in Microsoft Excel. Imagine you have dates in random formats and you want to apply a single format to all of them. A macro can do that for you. You can record a macro applying the format you want, and then replay the macro whenever needed.
When you record a macro, the macro recorder records all the steps in Visual Basic for Applications (VBA) code. These steps can include typing text or numbers, clicking cells or commands on the ribbon or on menus, formatting cells, rows, or columns, or even importing data from an external source, say, Microsoft Access. Visual Basic Application (VBA) is a subset of the powerful Visual Basic programming language, and is included with most Office applications. Although VBA gives you the ability to automate processes within and between Office applications, it is not necessary to know VBA code or computer programming if the Macro Recorder does what you want.
It is important to know that you when you record a macro, the Macro Recorder captures almost every move you make. So if you make a mistake in your sequence, for example, clicking a button that you did not intend to click, the Macro Recorder will record it. The resolution is to re-record the entire sequence, or modify the VBA code itself. This is why whenever you record something, it's best to record a process with which you're highly familiar. The more smoothly you record a sequence, the more efficiently the macro will run when you play it back.
Macros and VBA tools can be found on the Developer tab, which is hidden by default, so the first step is to enable it. For more information, see Show the Developer tab.

Record a macro
There are a few helpful things you should know about macros:
- When you record a macro for performing a set of tasks in a range in Excel, the macro will only run on the cells within the range. So if you added an extra row to the range, the macro will not run the process on the new row, but only the cells within the range.
- If you have planned a long process of tasks to record, plan to have smaller relevant macros instead of having one long macro.
- It is not necessary that only tasks in Excel can be recorded in a macro. Your macro process can extend to other Office applications, and any other applications that support Visual Basic Application (VBA). For example, you can record a macro where you first update a table in Excel and then open Outlook to email the table to an email address.
Follow these steps to record a macro.
- You have to first enable macros in Excel. To do this:
- On the Developer tab, in the Code group, click Macro Security.
- Under Macro Settings, click Enable all macros (not recommended, potentially dangerous code can run), and then click OK.CAUTION: Malicious macro code can seriously damage your computer. To help prevent potentially dangerous code from running, we recommend that you have a virus scan application installed, and return to your default macro setting after you finish working with macros.
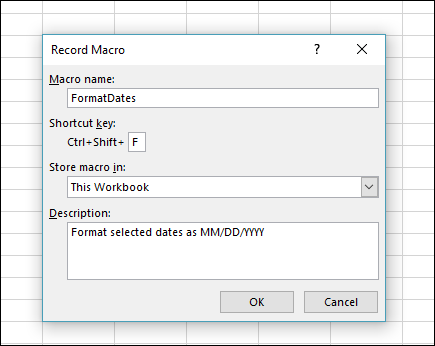
- On the Developer tab, in the Code group, click Record Macro.-OR-Press Alt+T+M+R .

- In the Macro name box, enter a name for the macro. Make the name as descriptive as possible so you can quickly find it if you create more than one macro.NOTE: The first character of the macro name must be a letter. Subsequent characters can be letters, numbers, or underscore characters. Spaces cannot be used in a macro name; an underscore character works well as a word separator. If you use a macro name that is also a cell reference, you may get an error message that the macro name is not valid.
- To assign a Control (Ctrl) combination shortcut key to run the macro, in the Shortcut key box, type any letter (both uppercase or lowercase will work) that you want to use. It is best to use Ctrl + Shift (uppercase) key combinations, because the shortcut key will override any equivalent default Excel shortcut key while the workbook that contains the macro is open. For instance, if you use Ctrl + z (Undo), you will lose the ability to Undo in that Excel instance.
- In the Store macro in list, select where you want to store the macro.In general, you’ll save your macro in the This Workbook location, but if you want a macro to be available whenever you use Excel, select Personal Macro Workbook. When you select Personal Macro Workbook, Excel creates a hidden personal macro workbook (Personal.xlsb) if it does not already exist, and saves the macro in this workbook. In Windows 10, Windows 7, and Windows Vista, this workbook is saved in the C:\Users\user name\AppData\Local\Microsoft\Excel\XLStart folder. In Microsoft Windows XP, this workbook is saved in the C:\Documents and Settings\user name\Application Data\Microsoft\Excel\XLStart folder. Workbooks in the XLStart folder are opened automatically whenever Excel starts, and any code you have stored in the personal macro workbook will be listed in the Macro dialog, which is explained in the next section. For more information, see Save a macro.
- In the Description box, optionally type a brief description of what the macro does.Although the description field is optional, it is recommended you enter one. Also, try to enter a meaningful description with any information that may be useful to you or other users who will be running the macro. If you create a lot of macros, the description can help you quickly identify which macro does what, otherwise you might have to guess.
- Click OK to start recording.
- Perform the actions that you want to record.
- On the Developer tab, in the Code group, click Stop Recording
 .-OR-Press Alt+T+M+R.
Working with recorded macros in Excel
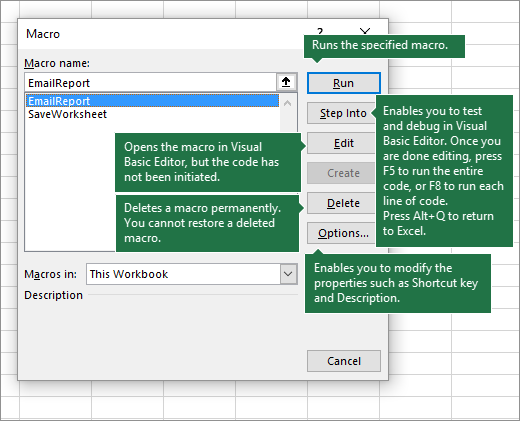
In the Developer tab, click Macros to view macros associated to a workbook. Or press Alt+ F8. This opens the Macro dialog box.

NOTE: Macros cannot be undone. Before you run a recorded macro for the first time, make sure that you’ve either saved the workbook where you want to run the macro, or better yet work on a copy of the workbook to prevent unwanted changes. If you run a macro and it doesn’t do what you want, you can close the workbook without saving it.
Here's further information on working with macros in Excel.
Task
|
Description
|
|---|---|
Read specific information on available security settings for macros, and their meaning.
| |
There are several different ways you can run a macro, such as using a shortcut key, graphic object, Quick Access Toolbar, a button, or even when opening a workbook.
| |
You use the Visual Basic Editor to edit the macros attached to a workbook.
| |
If a workbook contains a VBA macro that you would like to use elsewhere, you can copy the module that contains that macro to another open workbook by using the Microsoft Visual Basic Editor.
| |
Assign a macro to an object, shape or graphic
|
|
You can assign a macro to a graphic icon, and add it to Quick Access Toolbar, or the ribbon.
| |
You can assign macros to forms and ActiveX controls in a worksheet.
| |
Learn how to enable or disable macros in Office files.
| |
Open the Visual Basic Editor
|
Press Alt+F11
|
Learn how to find help on Visual Basic elements.
|
Working with recorded code in the Visual Basic Editor (VBE)
You can work with recorded code in the Visual Basic Editor (VBE) and add your own variables, control structures, and other code that the Macro Recorder cannot record. Since the macro recorder captures almost every step you take while recording, you can also clean up any unnecessary recorded code that serves no purpose in the macro. Reviewing your recorded code is a great way to learn or sharpen your VBA programming skills.
For more information on modifying recorded code in an example, see Getting Started with VBA in Excel.
Need more help?
You can always ask an expert in the Excel Tech Community, get support in the Answers community, or suggest a new feature or improvement on Excel User Voice.
Record a macro to open specific workbooks when Excel starts
Applies To: Excel 2013
Suppose you want to record a macro to open workbooks you use every day when you start Excel. You can create an Auto_Open macro to do that. You may also want to run a macro automatically when opening a workbook.
Before you get started, make sure the Developer tab is shown on the ribbon. If it’s not there, do the following:
- Click File > Options > Customize Ribbon.
- Under Customize the Ribbon, in the Main Tabs box, check the Developer box.
- Click OK.
To open workbooks automatically when Excel starts:
- Click Developer > Record Macro.

- In the Macro name box, type Auto_Open.
- In the Store macro in box, pick Personal Macro Workbook.
- This will make the macro available every time you open Excel.
- To remind you what this macro does, enter a description in the Description box. You can also leave this box blank.
- Click OK.
- Click File > Open, and select the files you work on every day. The files can be in multiple locations. Press Shift to select multiple files in the same folder.
- Click Developer > Stop Recording.
- When you close Excel, you’ll eventually be prompted to save the changes you’ve made to the Personal Macro Workbook. Click Yes so that your macro will run whenever you start Excel.Each time you start Excel, the workbooks you included in the macro will automatically open.
Create and save all your macros in a single workbook
Applies To: Excel 2016 Excel 2013 Excel 2010 Excel 2007
When you first create a macro in a workbook, it works only in that workbook. But what if you want to use the macro in other workbooks? To make your macros available every time you open Excel, you can create them in a workbook called Personal.xlsb. That’s a hidden workbook stored on your computer, which opens every time you open Excel.
Before you get started, make sure the Developer tab is shown on the ribbon. For more information, see Show the Developer tab.
Next, create a macro. We’ll record a very simple example that will format the text in the current cell as bold.
You can learn more about creating macros in Quick start: Create a macro.
- In cell A1, enter “Some text,” and then press Enter.
- Click Record Macro.

- In the Record Macro dialog box, type a name for the macro in the Macro name box. For example, type BoldMe.Don’t use any spaces in the name.
- In the Store macro in box, pick Personal Macro Workbook > OK. This is the most important step, because if you don't already have a Personal Macro Workbook, Excel will create one for you.
- Click in cell A1 and press Ctrl+B to apply bold formatting.That’s the only step in the macro.
- Click Developer > Stop Recording.
- Close any open workbooks, and then exit Excel.A message appears that prompts you to save the changes that you made to the Personal Macro Workbook.Click Save to save the personal workbook.
The next time you open Excel, the macro you created is available. To see it:
- Click Developer > Macros to launch the Macro dialog.Our example macro is called PERSONAL!.BoldMe.
- If you don’t see the macro, in the Macros in box, click PERSONAL.XLSB.To run the macro, see Run a macro.
Moving macros from one computer to another
Say that you get another computer and want to move or copy all of your macros to that computer, or you want to share your macros with someone else. It’s not possible to share your Personal.xlsb between computers, but you can copy it to the XLSTART folder on other computers or copy some or all of its macros to the Personal.xlsb file on other computers. In Windows Explorer you can search for XLSTART to locate the folder.
If you have one or just a few macros that you want to share with others, you can send them the workbook that contains it in an email message. You can also make the workbook available on a shared network drive or from a SharePoint Services library.
For more information about copying a macro from one workbook to another, see Copy a macro module to another workbook.
Unhide your personal workbook
Any macros you save to the personal workbook can be edited only by first unhiding the personal workbook. When you start Excel, the personal workbook is loaded but you can’t see it because it’s hidden. To see it:
- Click View > Unhide.
- In the Unhide dialog box, you should see PERSONAL.XLSB.
- Click OK to view the personal workbook.
- To hide the personal workbook, make sure you have Personal.xlsb selected, and then click Hide on the View tab.
- PERSONAL.XLSB will always be editable in the Visual Basic Editor (VBE).
Any time you create a new macro and save it in your personal workbook or update any macros that it contains, you are prompted to save the personal workbook just as it did the first time you saved it.
Save a macro
Applies To: Excel 2013
You create a macro in Excel by running the macro recorder or by using the Visual Basic for Applications (VBA) editor. After you've created your macro, you'll want to save it so you can use it again in the current workbook or in other workbooks.
Save a macro with the current workbook
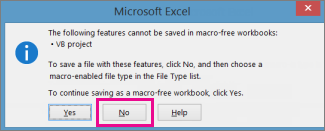
If you'll need the macro only in the workbook where you created it, click Save or Save As like you normally would. But saving a workbook with macros is a little different because it needs to be in a special "macro-enabled" file format. So when you try to save it, Excel prompts you with two choices:

- Save it as a macro-enabled workbook (*.xlsm file type) by clicking No.
- Save it as a macro-free workbook by clicking Yes.
To save it as a macro-enabled workbook:
- Click No.
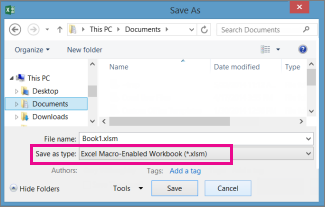
- In the Save As box, in the Save as type list box, choose Excel Macro-Enabled Workbook (*.xlsm).

- Click Save.
Create and save the macro in your Personal workbook
To make your macros available every time you open Excel, create them in a workbook called Personal.xlsb. That’s a hidden workbook stored on your computer, which opens every time you start Excel. See Create and save all your macros in a single workbook to learn how to do this.
Comments
Post a Comment